lab_8
Volumetric Change Detection
Introduction:
Referring to our previous lab exercise, calculating the volume of the sediments in the construction area is the profitable business resources. There are many equipment to measure the volume but we had chosen to fly the UAS to capture the images and calculate the volume, which was very efficient. In this lab exercise, we are going to make a map that shows the sediment volume change over the times. Then we will compare the recent year with old year to detect whether the sediment had been taken out or added more. Additionally, we will adjust the thresholds of the measurement to see the particular amount of the changes. This kind of study is important for people who are researching the sediment erosion and deposition. Theses people can predict the how much of the erosion and deposition have been happening in certain area. We are going to use DEMs (Digital Elevation Model) at same projection and relay them together and subtract old from new time period to calculate the changes.
Study Area:

Figure 1. Study Area map, Scotland, UK
In this river system, we can see the erosion or deposition by the water flow. Many of the sediment might have been eroded and washed out during the flood, and those washed out sediment would be deposited somewhere nearby the river.
Methodology:
First, we need to install the "Geomorphic Change Detection Software". Open the software and start the new project.


Figure 2. Geomorphic Change Detection Software.

Figure 3. Create new project
Make sure you decide the right folder to save your outcomes. Always keep in track where you saved your outputs. If you don't remember or saved on the incorrect folder, your project would tern to be messed. Keep the parameter as default because, we want our results to be shown as meter scale.

Figure 4. Add Existing DEM Survey.
Add your acquired DEM 2003 in the original raster portion. After that, add rests of the DEMs in this case, we use 2003,2004,2005,2006 and 2007.
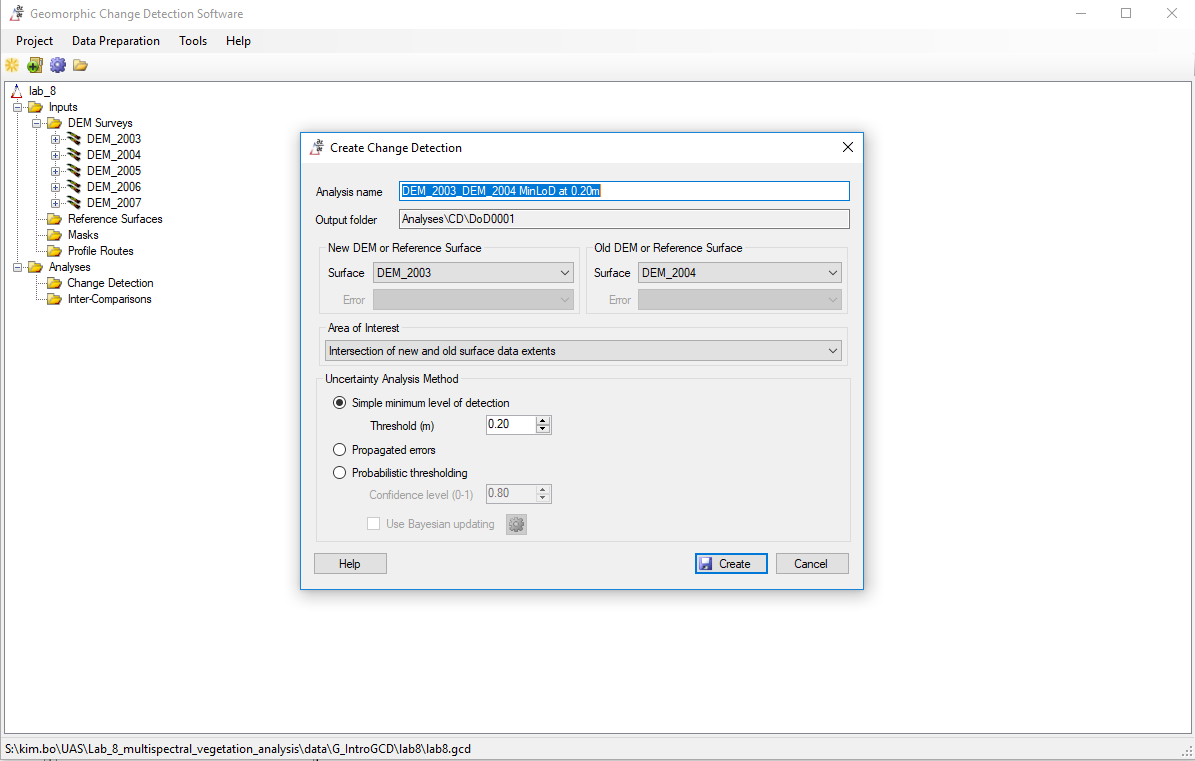
Figure 5. Create Change Detection.
Create change detection of the DEM. Name will be changed automatically, input the recent year DEM to the "New" and old DEM to the "Old" because, you normally subtract new to old to see the change. Set the threshold that you would like. 0.2m = 20cm, you would see the changes above and below the 20cm.

Figure 6. Change Detection Results


Figure 7. Graphical Results
Once you created, program will give you the result of the volume changes. You can see the volume of the rising and lowering. Rising means deposition and lowering means erosion.
we can also see the different kind of the graphs. For example, histogram, box-plot and normal distribution.
Additionally, we can also apply the multiple threshold.

Figure 8. Batch processing of change detection
Results;
Threshold 0.5m
|
Threshold 1.0m
|
Threshold 1.5m
|
|
2003 - 2004
|
-838.16 (m^3)
|
-96.46 (m^3)
|
0
|
2004 - 2005
|
-1311.4 (m^3)
|
-399.62 (m^3)
|
66.04 (m^3)
|
2005 - 2006
|
-538.84 (m^3)
|
-91.07 (m^3)
|
0
|
2006 - 2007
|
-3365.09 (m^3)
|
-3237.14 (m^3)
|
300.78 (m^3)
|
2003 - 2007
|
-5798.34 (m^3)
|
-3161.09 (m^3)
|
-443.46 (m^3)
|
Figure 9. Net volume differences

Figure 10. Volume change detection from 2003 - 2007
Discussion:
According to the results, for example, years between 2003 to 2007 we have approximately 5798.34 m^3 of erosion in this river area. This might have been cause of flood or other environmental hazard we assume. In the table above, we are able to see as we increase the threshold there are less amount of changes are shown. This is obvious because you are removing the some changes within the threshold that you want to ignore. In the map, the red represents the deposition and blue represents the erosion.
Comments
Post a Comment